Yamaha TX750 Restoration: Adding some unsprung weight, the good kind.
Normally you want to take heavy things off of a bike. At least that is my philosophy. I want better performance when it comes to what I do on my bikes. Adding a hefty steel second disc to my already taxed front suspension seems counterintuitive to my building style. In this case the performance gain from adding the second disc is well worth the weight penalty. The TX750 is a big bike. The height 1970's technology was lots of thick steel, a huge mass of an aluminum engine and a tangled web of frame tubing making the TX a bit porky at around 518 pounds wet.
With just the one front disc, I was leery of trying to panic stop this beast from California freeway speeds. I intend to ride this bike. I mean ride. Multi-day trips to Northern California to watch the MotoAmerica races at Laguna Seca or to the Grand Canyon and back are my goal. Adding another 300mm disc seems like one way to improve the stopping power of this beast. In this post this is what I did to make it happen.
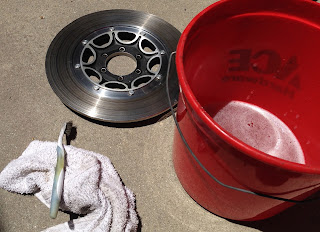
First things first, cleaning. The disc came from its eBay prior owner well wrapped and pretty clean. It was listed as a front brake disc from a 1973 Yamaha XS650. Yamaha changed the XS model name to TX for the ill fated '73 & '74 model years. The TX750 and the TX500 sales failures convinced Yamaha to change it back to an XS model designation to disassociate the only successfully selling bike of the tree from the ones Yamaha wanted to forget. Even though it was pretty clean I wanted to do some cleaning of my own to inspect the disc. Out came the bucket and brush.
The poor TX has been sitting for so long that The rest of the front wheel needed a scrub too. I gave everything a good once over and set it all in the sun to dry. The front rim looks good and the tire is brand new. Too bad it was brand new 8 years ago. I'm still debating replacing them when I get the bike back on the road.
To mount up the disc I pulled out an old used tire and flopped the rim combo up on it to have a solid place to work without damaging the right side front disc. Old tires makes good stands for doing tire or brake work like this. Besides it costs money to dispose of them and I'm saving money for a race trailer.
I couldn't have attempted any of the work I'm doing on the TX if I didn't have an original 1973 Yamaha service manual. I got this one from eBay as well. It looks to have been an old manual from a shop before being retired to internet auction sales. The picture above gives me all the specs for the entire brake system in one spot. After consulting the manual I set my 1/4" drive torque wrench to the right spec and mounted the disc.
Here you go. An extra 8 pounds of stopping power mounted and ready to go. I used split lock washers to mount the disc. The right side has three safety washers that secure two bolts in a pair with bent up tabs. They are still available and I will order some before mounting the wheel to the bike. I can use this setup to paint the inner part of the disc webbing a nice black to show off the aluminum of the wheel and shiny steel of the new disc.
The caliper bolts were also torqued to spec using the manual. The long double threaded bolt on the top right of the caliper and its partner on the left are switched when reassembling the caliper to change the mounting side from the right fork leg to the left. Yamaha designed the parts to be ambidextrous which is what allowed me to do this modification relatively cheaply compared to other bike models.
The caliper is wrapped up for painting. Too bad I spent time writing up this blog post instead of going shopping for black caliper paint. I covered all of the threaded parts along with the bleed valve and the Yamaha logo on the left side. The long tube is what connects the brake lines to the caliper in a setup very much like a cars setup. Most modern bikes use banjo bolt fittings at both ends of the line. This will be a challenge to find stainless steel wrapped teflon motorcycle brake lines that fit up with the hard steel lines I have here.
In the next installment I paint the caliper and disc and hopefully mount them to the bike for testing. Swing back on by when you can for more updates.
Blue


Comments
Post a Comment
Thanks for your comments and for following My Motorbike Obsessions!