More shocking suspension work. A rear end adventure.
One of the winter projects that I took on this past month was another quest to get a cheap suspension upgrade. My little Ninja is a test mule for any and all of my crazy ideas related to fabrication and race prep. If I can do those projects for less than $50 a pop, even better. This is another idea that came from the the Ninjette Forums, the greatest resource on the internet for all things related to the littlest of Ninjas. I have done several posts on setting up the front and rear suspension on the bike earlier this year in March and April as well as one a few weeks ago. Here is the fourth installment of my suspension work where I do a little more cross breeding with another Japanese motorcycle DNA to hustle the Ninja around the track just that much faster.
As the title of this post suggests, this time around I am going to improve the rear suspension of the bike. Back in April I upgraded the rear shock to a second generation Ninja 250 rear shock. The second gen 250's had a spring rate more capable of tackling my generous amount of heft. I felt the change right away and haven't had any complaints. The problem is that I have no more adjustment to the shock. It only has preload adjustment and that is maxed out. If I wanted to get more out of my rear suspension I'd have to upgrade. While cruising the aforementioned the Ninjette forums, I found this thread and pretty much did all of the same things the original poster did and installed a GSXR 600 rear shock into the Ninja. First things first I had to breakdown the rear end of the bike. Having done this a time or two, it was an easy process. I have half a dozen of those cheap magnetic parts trays that I use to hold the nuts and bolts of a disassembly process. I filled up two of them and got to the heart of the matter in about 15 minutes of wrenching.
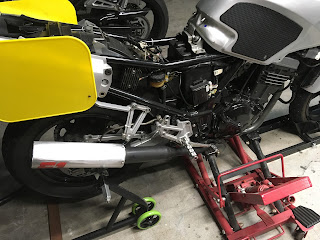
Buried in the upper left quadrant of this picture is the top bolt that holds the current rear shock in place. There is a matching bolt and nut in the bottom of the swingarm assembly. To get the shock out I need to raise the center of the bike up on my ATV jack to allow the swingarm to droop. I then remove the lower bolt/nut combo and let the swingarm drop. After that I free the top bolt and drop the shock out of the bottom of the bike. While I was in the area, I made plenty of mental notes on hose routing, electrical cable placement and the assembly of the battery box and rear inner fender attachment points. These were the things that would make this a bit more difficult than just a quick shock swap like I did previously.Getting the inner fender and the air box/battery box combo out of the way reveals more space, but not much more. I took the shock and worked out how to get the shock into and out of position. I wanted to make sure I wouldn't have to disassemble the rear shock linkage to install the shock. Luckily I didn't end up having to. I also wanted to get a jump on imagining myself adjusting the spring preload at the track. I have two spanners that I can use to adjust the spring collar and collar lock nut. It will be tight, but with this type of shock its usually pretty straightforward to do. For the moment, I downloaded a GSXR 600 service manual so it would tell me how to adjust the shock settings. I set all four of the settings to the exact middle of their adjustment range. I will have to test them at the track to see if they are what I need. If I go back to Buttonwillow, I may be able to have Dave Moss take a look at my tire temps and wear patterns to see how close they are to the ideal setting.
Here are the three shock options side by side for comparison purposes. On the left is the new-to-me GSXR 600 shock. The middle is the OEM 2004 Ninja 250 shock. On the right is the 2008+ Ninja 250 shock. The OEM shock had no adjustments and a relatively weak spring. The 2008+ Ninja shock has spring preload and an upgraded spring that is more suited to my body weight. The GSXR shock has spring preload and a spring that has almost exactly the same specs as the newer Ninja. It also has high and low speed rebound dampening adjustment as well as compression dampening adjustment. The eye-to-eye length of all three shocks is the same and that, along with the upgraded adjustability, is what makes this a common swap in the Ninja 250 community, especially for those that track/race the Ninjas. The fact that you can get one of these shocks on eBay for around $30 really helps too!
Dropping in this shock isn't a bolt on affair however. You can see from the pic of the shocks above that the GSXR shock has a gas cartridge section that will require some plastic surgery with the air box/battery box and the rear inner fender to make fit. Another adjustment required is the inside width of the lower shock mount tabs. The GSXR shock is narrower between the mounting tabs than the OEM shock. I only needed to remove 2 mm of the aluminum, but I had to be careful with the tools I used to do it. I didn't want to take off too much and have the shock mount loosely to the swing arm knuckle or to end up with the mount off center. At first I used a hand file, but switched to my angle grinder with an 40 grit flapper disc. This took off the material I needed more quickly. I did have to do some touch ups with the file afterward, but it fit with a few minor adjustments after some trial fitments.
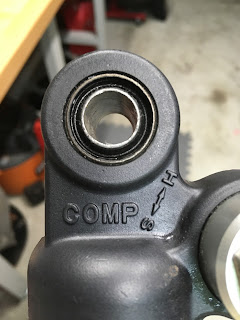
The hardest modification I needed to do to the shock was to open up the upper mounting bolt hole. I had to do this to the bottom hole too, but that was very easy as there was a bunch of aluminum there to drill. This picture is the after pic and you can see that the metal sleeve that makes up part of the upper mount bushing didn't have much meat on it after I drilled it out. I went a little too fast and the other side of the hole is slightly off center, but all in all it was easy enough and came out well. After the multiple test fittings of the bolts in the modified holes I was ready to try to get the shock wedged into the frame and mounted and the swing arm.
After getting the bolt bores properly sized and the lower mount tabs thinned out, I tried installing the shock only to run into more interference. The bracket that is getting in the way is is an attachment point for the inner rear fender. Since there isn't much weight at this attachment point I decided to cut it off and clear room for the shock's gas cartridge. This would be a tricky thing. I don't want to end up cutting into something important or worse, lighting the bike on fire thanks to the sparks and their proximity to the carbs. I did some test tries with an unplugged grinder and then just decided to go for it. My only consideration to safety was eye protection and a rag to cover the carb inlets and remove the potential for a 9-11 call. I do have a fore extinguisher handy as well.After cutting most of the offending bracket off, I did another test fit. The shock finally fit into its intended location. The remaining sections of the bracket still came into contact with the shock so I removed the shock once again and did more trimming. Once I was satisfied, I slowly and methodically put it all back together. I have a track day coming up later this month and I don't want any loose bolt surprises. It is at this point that I stopped taking pictures. I just wanted to get the project done. Any pictures would be pretty boring since the shock is buried in the guts of the bike so there is nothing to see anyway. I did a bounce test after getting the bike back together. It felt different. Not super stiff, but more ready. Chuckwalla has some bumpy sections from the cars that also do track days out there. This new shock seems to ready to tackle them at high speeds. I can't wait to get back out there and try it out.
Thats it for this post. I will be getting the bike ready for my January track day out at Chuckwalla with TrackDaz. It is the third round of their 2017-2018 race season and like always the track day is on a Friday. One of these days, hopefully soon, I will be joining them for the whole weekend by racing too. Aside from the track day, I have some more content in the works, including getting out to some flat track races soon I hope. See you later!
Blue


Comments
Post a Comment
Thanks for your comments and for following My Motorbike Obsessions!