Yamaha TX750 Restoration: Brakes are done!
After getting the caliper and brake disc painted in the last post update, it was time for the mount up. Here is the exciting (or not so much) conclusion of the Yamaha TX750 Restoration, Dual Disc Upgrade.
I disassembled the caliper once more to install the pads and spring retainers. The calipers are made to replace the pads without taking them apart. Unfortunately I didn't press the pistons far enough into their bores to be able to do that. After some quick wrench work and a gentle push, the pads and retainers were in and the caliper reassembled.
I mounted the caliper onto the left fork leg where it will permanently reside once this is all done. You can see in this pic that the paint matched up pretty well after I cleaned up the right side caliper a bit. I grabbed the front wheel and went to roll it into place only to find that I can't mount the wheel with both calipers in place. Off came the wheel for try number two. I'm sensing a foreboding theme here...
And here is the final assembledge of the the wheel and brakes. This time you get to see it from the right side. The calipers are a bit finicky to get on and off the fork legs with the wheel in place, but it can be done with patience. There was a bot more brake drag on the front wheel which is to be expected after doubling the number of friction surfaces dragging on the discs. Next up, pipes and hoses.
I used the original right side hose that I had replaced to mock up the left side brake line. In this pic you can see the banjo heads of the lines as they tie into the hard connection coming from the triple tree. The newer hose is on the left with the older on the right. I used a double banjo bolt and some new washers to mount both hoses up. Both lines fit well so now I can proceed to order another replacement hose.
With the front fender installed it all looks factory. This is how the bikes were sold in Europe. I have no clue why Japan thought the American bikes didn't need dual front discs, but I'm glad Yamaha designed the fork legs to be ambidextrous. The only thing missing is a small bracket that holds the brake hose to the fork leg right where the hard line on the caliper meets the rubber hose. Maybe I'll try to fab one up using the right side one as a model.
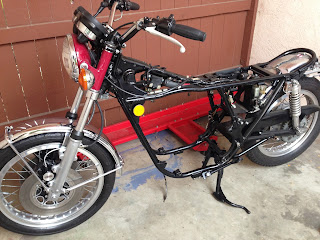
Once again I have a roller. Even in this stripped down form I can see the beautiful UJM lines of the bike and just fall in love all over again. I still have to get the new hose attached before a final fluid fill and bleed. The master cylinder cap calls for DOT 3 fluid and of course I have two perfectly good bottles of DOT 4. At least its not expensive. I won't bother with an update after the fluid fill as I have engine work to get into.
Come back around again for some tool updates that will make the engine rebuild much easier.
Blue.


Getting there bud! At this pace you'll be able to ride to the mailbox and collect your first retirement check!
ReplyDeleteGreatness takes time or in my case mediocracy takes forever. Thanks for the comment and thanks for visiting the site!
DeleteI'm picking one of these up on Saturday hopefully and I'm going to start figuring out what it needs to run. Very interested to watch your journey
ReplyDeleteGlad you are getting something from the site. Hopefully I'll have more content for you soon. I should be digging into the engine shortly!
ReplyDelete