The Motorbike Obsessions Race Team takes it to a new level!
The sadness at selling the TX lasted about as long as it took me to get some lunch. The drive through LA traffic put me in a bit of an angry mood that a burger and some fries helped to quell. On my way back home I stopped off at my favorite tool store to get something I've been wanting for a few months, the ability to tow my race bike to the track! Scroll on down to see how it went.
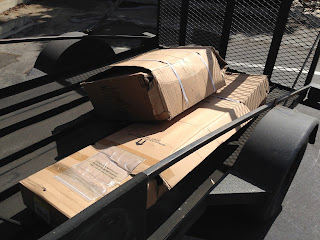
Since I had a borrowed empty trailer with me, I figured that filling it would help fill the hole in my heart from the TX's departure. My lovely wife quickly, and with Samurai like deftness, killed all thoughts of picking up another project bike on the way home. The next best thing was to get my very own race trailer. And by race trailer I mean a 4'x8' Harbor Freight 1195 lb. capacity folding trailer. Here is how they come from the store. The squarish box on top has the hardware, wheels and tires, electrical wiring etc. The longer flat box below has all of the trailer pieces and the instruction manual. I also picked up a few odds and ends while I had 20% off coupons in my hand.The two boxes were not in the best condition by the time I got home and removed them from the trailer. They weren't the in the best condition when the guys from Harbor Freight pulled them from the back of the warehouse and put them into the trailer. I was able to unload the small box whole, but had to unload the bigger box by taking the trailer parts out of the ripped up box piece by piece. I laid them all out on the shop floor and compared them to the assembly manual. Since I had done some research prior to purchasing this trailer, I knew that the main trailer parts would not come labeled. I took my sharpie and labeled the bigger ones once I had accounted for all of the parts. Everything was in good shape and I was happy to see that nothing was missing.
I opened up the little box and pulled out the parts it had as well. Here is the big bag of hardware I was expecting from reading about other people's experiences who had gotten one of these trailers. Separating these should be fun. I will assemble the trailer with the hardware provided and see how it goes. After a while I will probably weld the joints between the beams for peace of mind and to ensure nothing loosens itself up over time. The nuts provided are the nylon locking type and will do a good job of holding thing together until I can fire up a welder. I will use my electric impact wrench to make sure things are tight.
I loosely assembled the front half of the trailer using sockets and wrenches. After I had everything just snug, I measured corner to corner to ensure that everything was square. I then broke out my electric impact wrench to torque it all down. Once I did that it was a solid, if cumbersome piece. It isn't heavy just awkward to move around the shop. I repeated the procedure for the back half of the trailer and carried on with the assembly plans.
I placed both halves of the trailer in the fully assembled position and started working on the front tow bar section. One thing I noticed when attaching the stake pockets to the trailer frame sides was that the torque from the electric impact wrench would twist the pocket out of square. I may have to tweak these if or when I decide to add sides to the trailer. In this picture you can see where the trailer folds in the center. The back half folds up over the front half and the tow bar folds down when you stand the trailer on some casters that are exposed when folding the halves together. This way the whole assembly is only supposed to take up a 5'x2' footprint and can be moved on the casters as needed. This is perfect for my one car garage shop.
The front tow bar pieces are assembled in this picture. At the very front there are 10 sets of the 10mm diameter x 20mm long nyloc nuts and bolts. There are 78 sets of these total to assemble the whole trailer kit. The tow bar assembly is hinged in the front with some 12mm diameter bolts and locked into place with some stout looking hitch pins with clips. The ball coupler for the 1 7/8" ball mounts to the very front with a couple of other 12mm bolts. My current hitch ball is a 2" ball so I'll have to get another hitch. I stopped the assembly process here. The instructions want me to bolt the halves of the trailer together and flip it over to assemble the rest of the kit. This includes the axle and wheels.
That will have to wait for another day as I need another adult male about to assist with that procedure or I will otherwise risk damage to myself or to the trailer doing it alone. Once complete I will have to go through the process of getting the trailer registered and set up for hauling a bike. Then I will be able to head out to the track whenever I have a free day. Monday's at the kart track are only $15 dollars for members so I think I will be taking a few Mondays off here soon.
Come on around again for an update to the race trailer! Bye for now.
Mat


Comments
Post a Comment
Thanks for your comments and for following My Motorbike Obsessions!