Training, underwear fashion and pressure gauges
In last week's post, I talked about the options for my previous weekend's plans. I was pretty much undecided until I got home from "work" on Friday. After I pulled off my riding gear and sat down with a cold drink, my weekend plans had solidified, though I felt a twinge of regret. Looking back, I made the right choice, but man sometimes it is hard to choose when I have so many choices. This post details how I made my decision and a few words about gear that have I have relied on over the last few weeks. Anyway, a long, rambling intro to an enjoyable bit of content. Read on.
Lastly, to bring this post full circle I wanted to talk air pressure gauges. As a gift from the Lee Parks Total Control class I attended, I got a nice stick type air pressure gauge. I also recently picked up a second Stockton dial air pressure gauge from Cycle Gear. I now have a Stockton gauge for the shop, and one for the track as well as a backup gauge with my Total Control gauge. As nice as all these look, how do they perform? Well, I don't have an air gauge calibration tool handy. I do have the ability to triangulate however. By triangulate I mean I can measure the tire pressure of one tire with all three gauges to compare how the three gauges measure up to each other. I tested these on the rear tire of the FZ. Its kind of hard to see in this picture, but the readings are 39.5, 40 and 40.5 psi after multiple readings with each one. The readings were within 0.5 psi for each of the gauges, each time I measured the pressure. So I now knew I had pretty good precision. Precision is what I am after. Precision is the repeatability of the measuring device. Accuracy is the measure of how close to the actual pressure the gauge reads. Because I had a total variance of only 1 psi over the three gauges, I feel I can trust all of these gauges to be good enough to get me the right pressure when needed for my track and street riding.
Hopefully you found this post informative. This weekend I will be racing at the SCFTA Round 6 races at Perris Raceway. I am excited to get back out on the track. With all of the things I've learned over the last few weeks, I think I can really get out there and race! Of course I'll have a report for you the readers come next Friday. Until then, ride safe friends!
Blue
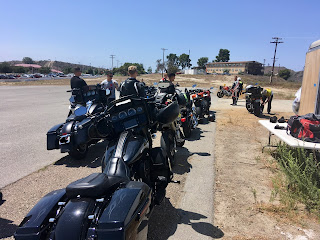
Here is the morning scene from my Friday work day last week. As a military rider at a very large base, I am lucky enough to get free access to several major motorcycle training programs. MSF, Lee Parks Total Control, American Supercamp are among the most notable ones. Last Friday I took the Lee Parks Total Control Advanced Riders Course Level 1. It is the third in the Total Control continuum of training. The class focused on cornering prowess and motorcycle chassis dynamic control. The class consisted of 10 riders ranging in experience from brand new to riding veterans. The bikes also had a similar spread of diversity from a brand new Full Dress Harley on one end to a 250 Supermoto on the other. It was another warm, clear day here in sunny SoCal. A perfect day to work on my riding.
In the shot above you can see one of the range exercises that we would be doing. As I mentioned, the focus of the course would be cornering skills. This is a 40 foot diameter circle. We did various exercises involving body position in tight turns using these circles. We also worked on throttle control and a bit of trail braking. Not racing style trail braking, but more attention paid to application of the throttle and brake at the same time to maintain chassis stability while decelerating. The course included warm up laps before every range exercise and even a demo on setting suspension sag which I found very useful. As usual, the instructors gave us demos of the exercises after explaining the task. We had a combination of classroom work and range training. It was a long day. We started at 8:00 am and didn't finish until 5:00 pm. By the time I got home, I was done for the day. This prompted my decision to not go racing last Saturday and the source of my regret. I had gotten too much sun and wanted to take it easy even though the races turned out to be pretty epic.
Now for my impressions of the class. My overall summary is that it is a good class, with a few caveats. Those caveats are the type these classes always have. One thing that always irks me is that the exercises are too specific for the range of bikes attending the class. For example, most of the cornering exercises were supposed to be done in second gear. I tried that once and the FZ1 didn't like it at all! My throttle is a quick turn throttle. When I did the deceleration drill, I kept getting dinged for too abruptly coming off the gas. When my top speed was only 25 mph, there isn't much throttle opening to slowly close. The exercises are all done in relatively small parking lots. This means there isn't room to physically get set before the exercise. The exercises are short so you spend lots of time waiting. I left the training trying to feel good about the day, but was nursing a bit of frustration on the ride home. The next day after a good night's sleep, I was feeling better about what I learned. I grabbed my cones and went back to the range we had used. I practiced doing the same exercises we learned the previous day. By the time I was done I felt much better about the training. It seems I actually learned something despite the down sides of the course I mentioned. I then immediately went for a 2 hour ride on some of my favorite twisty roads. I was able to put those lessons into play. I had a great ride and really feel like the training was successful. I still think I have valid complaints, but at least I got my money's worth!
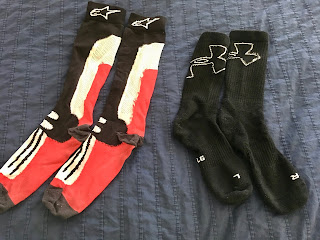
In the intro I mentioned underwear fashion that I have come to rely on over the last few weeks for my riding and racing kit. I'll start at the bottom. On the left are some Alpinestars super fancy, schmancy riding socks. Don't buy them! They are long and very ventilated, which are good things. They were also expensive at $17 for the pair and feel cheap and not all that great. On the right are a better alternative. These are Under Armor athletic socks and are much improved over the motorcycle specific Alpinestars socks. The Under Armor socks were $15 for a three pack so already that's a bonus. They perform much better at wicking sweat from and keeping my feet cool in my boots. They also have some supportive compression that keeps my feet from feeling overly tired at the end of a track day. For those of you that have trouble remembering your left and right socks from each other, they are labeled for ease of use!
Here are some of my other underwear choices. These are two types of base layer shirts I routinely use. The top shirt is one of the Cycle Gear Heat Out shirts that they pitch to you when checking out at the cash register. It actually works pretty well at wicking sweat and promoting better cooling when riding. The bottom shirt is a Starter performance athletic under shirt. Both of these have a nice, tight, compression fit that I like. Having the tighter fit keeps the bulk factor low when layering my riding gear. I typically use the same mindset that snowboarders do for a day at the slopes. I dress in multiple layers and add or shed layers as needed. While intended for keeping the wearer cool, I've found that both of these also work well when I want to keep warm. By having the compression base layer, I can add other warm layers and feel pretty comfortable in temps from the low 40's up to the upper 90's. Outside of this range I think I would need some specialty gear to maintain comfort. On the left are some knee sleeves I wear under my knee pads. They function to keep my knee joints warm and functioning better over a long day of riding. Since I am starting to reach a very "mature" age, this last bit is pretty important.Lastly, to bring this post full circle I wanted to talk air pressure gauges. As a gift from the Lee Parks Total Control class I attended, I got a nice stick type air pressure gauge. I also recently picked up a second Stockton dial air pressure gauge from Cycle Gear. I now have a Stockton gauge for the shop, and one for the track as well as a backup gauge with my Total Control gauge. As nice as all these look, how do they perform? Well, I don't have an air gauge calibration tool handy. I do have the ability to triangulate however. By triangulate I mean I can measure the tire pressure of one tire with all three gauges to compare how the three gauges measure up to each other. I tested these on the rear tire of the FZ. Its kind of hard to see in this picture, but the readings are 39.5, 40 and 40.5 psi after multiple readings with each one. The readings were within 0.5 psi for each of the gauges, each time I measured the pressure. So I now knew I had pretty good precision. Precision is what I am after. Precision is the repeatability of the measuring device. Accuracy is the measure of how close to the actual pressure the gauge reads. Because I had a total variance of only 1 psi over the three gauges, I feel I can trust all of these gauges to be good enough to get me the right pressure when needed for my track and street riding.
Hopefully you found this post informative. This weekend I will be racing at the SCFTA Round 6 races at Perris Raceway. I am excited to get back out on the track. With all of the things I've learned over the last few weeks, I think I can really get out there and race! Of course I'll have a report for you the readers come next Friday. Until then, ride safe friends!
Blue


Comments
Post a Comment
Thanks for your comments and for following My Motorbike Obsessions!