Finally, parts are going back on the bike! Wiring harness inspection and simplification.
I finally got my butt back out in the garage to do a job I've been apprehensive about. Like most jobs of this sort it was not as bad as I feared and much easier than I anticipated. I made my way to the shop to clean and inspect the wiring harness. For this garage session I tried using one of my GoPros to do the photography as a test. It works, but my iPhone actually will do better photography. I'll stick with using the action cameras in video mode.

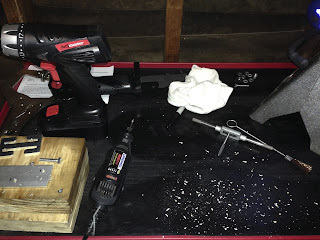
First up, tools for this type of job. Here I have the bike specific shop manual up at the top of the pic. I only have the base manual and need to pick up the model specific addendum. Many manufacturers put out one main manual for a particular bike model and then only issue addendum's for the successive model year updates. I had some differences between what I had in my hand and the manual that I had to work around. I also had a power tester to the left. It is used when the circuit is energized and lets you probe connectors to see if they are powered up. Lastly I had two different multi meters. The one on the left is a Harbor Freight freebie that works quite well. The one on the right is one that I got when I was 20 years old that still works today.

After getting my tools and shop drink of choice popped open, I sat down and wiped down the harness. I wanted to take this time to study the connectors and plan what I wanted to inspect. From the nature of the fault I had and the plethora of "expert" advice available on the Internet I surmised that I had a ground fault somewhere. While wiping down the harness I was able to do my first visual inspection to see if I had any cuts or worse, burns that would point me to the issue. I was fortunate that none of those exist. It is good news, but makes the rest of the job a little tougher.

After wiping down, I went through the harness and started to identify the connections that I won't be needing for the race bike. There are several that are now redundant as I have removed the light or switch. I bundled the connectors that I could and zip tied them to the main harness to keep them out of the way. In the pic above you can see that the harness looks a little more simple and easier to decipher.

Here is a close up of how I bundled the harness pig tails. This bunch is the headlight, gauges and a spare power outlet that go in the head stock area. All of those components have been removed so I won't be needing these. I went through the full harness checking the ground connections at all of the major harness junctions. This harness uses a yellow/black wire as a backbone ground connection for all of the components. The yellow/black wire connects all things that need a negative connection back to the battery negative to compete the circuit. I put the multi meter on the ground connections and checked all of the other wires that tie into them while performing a more detailed visual inspection of the harness condition. Nothing tested bad. I suppose I will need to ensure that when I finally reinstall the harness I ensure that I get a good ground connection and will hope for the best.

After doing all of that work, I laid the harness onto the bike to see how I can reroute the connections so that all of the main components are connected and routed under the seat in a soon to be constructed under seat electronics tray. Here is the seat area and at first glance, it looks good.

The biggest headache will be the front of the bike and the connections that go to the coils and most of the bike's sensors. I want to get an aftermarket tachometer that has a few idiot lights and plug my sensors back into them so that I have some idea what the bike is doing after having removed the stock gauge cluster. I will leave the wiring loosely positioned so that I can start test fitting other things like the gas tank and seat before I begin the limited fabrication work that will go into the bike. I'm looking forward to cutting some metal so hopefully over the upcoming long weekend I'll have made some more great progress. Thanks for stopping by!
Blue
Comments
Post a Comment
Thanks for your comments and for following My Motorbike Obsessions!