Taking some junk out of the trunk. My Motorbikes takes the wrenches on the road to help a buddy.
I love turning wrenches. Mostly I focus on Motorbikes, but cars, bicycles, skateboards anything that I can work on to improve mechanical performance is fair game. When a buddy needed a little help to do some work on his bike at his garage, I loaded up some tools and headed out.
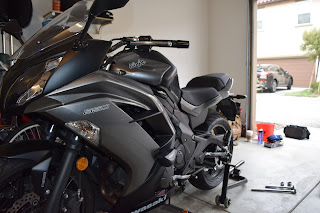
Here is the bike. A 2014 Ninja ER 650 Ninja. A parallel twin, 650cc, fully faired, new standard in the spirit of the 70's UJMs. I haven't ridden it, but the upright seating position and high handle bars give a nice, comfortable bike that is great for canyons or commuting. My buddy has had this bike for about a year now and has put on a little over 4000 miles with it. I have seen this bike ridden on multi day trips and slicing around the hills in Malibu. Now that it is thoroughly broken in, it screams when wanted and mild mannered for normal daily use.

Aside from some other routine maintenance, my buddy wanted to clean up the rear end of the bike. You can see in the pic above that the OEMs continue to design sexy flowing bodywork only to then tack on some ungodly ugly contraption of plastic to mount the turn signals and license plate at the last minute. I don't know who is responsible for designing these, but they need a kick in the pants to get them to try harder than this.

This will be the second under tail fender eliminator I have helped someone install. The other was a Yoshimura kit for an FZ-09. This one is an R&G kit ordered from Revzilla. At first glance it is a nice piece and a complete kit. Later on we discovered what to me is the bane of these type of kits that altered our evening plans.

I didn't photo every step of the process, but wanted to start with a quick pic of the starting point. Pulling the two piece seat reveals a very tidy, but surprisingly spacious seat trunk area that comes with a stock tool kit and plenty of extra room for auxiliary tools and other accessories if you wanted. The wiring for all of the lights was neatly secured and out of the way. All of the connections were easy to find, but were a bit tight and required some fiddling to get undone before we broke out the wrenches.

After getting all the wiring taken care of we pulled the stock fender. It is a honking big chunk of plastic with a backbone of metal. We were left with a small opening and a recess for the bracket. From here we started to mess with the R&G under tail bracket. This is where things started to go south. My buddy wanted to take the time to change over to some aftermarket LED turn signals. He went with the advice he found on Revzilla and ordered what he thought was a complete kit that should let him replace all of it at once. Aside from the R&G under tail, he had some R&G LED turn signals and some R&G turn signal resistors to ensure the LEDs flash at the right rate. All of the connections were bullet connectors which didn't match up with the OEM turn signal connections on the wiring harness without cutting and splicing.
Here is where I rant a bit. For the money you pay (always over $100) for what is essentially a bent and painted piece of metal and some some bolts along with vague photocopied instructions, you'd think you wouldn't have cut and splice the stock wiring in order to do complete the install. My other buddy's Yoshimura kit was especially disappointing in that it included some of the cheapest wiring components you could find. A trip to Radio Shack solved that install. We weren't able to do that on the Ninja so we just went with stock turn signals for now. I will do a follow on post when we put on the LED turn signals.

Here is the R&G under tail kit bracket mounted with the stock turn signals. The OEM turn signals are not bad for the ER 650, especially compared to the FZ-09 ones I did earlier. it comes with an LED license plate light that was pre-wired with bullet connectors. It ALSO came with a bullet connector to OEM harness license plate connector pigtail in the kit. Again, why didn't they do the same thing for the turn signals? They could have done that with resistor pigtails as easily as they did the license plate light.

Here it is mounted up from the rear. Much cleaner and more compact. After all was said and done, we couldn't get the license plate light to work. It was just two wires, one red and one black. I hooked them up to their corresponding colors on the OEM harness so it should have been easy. We lost the daylight and both wives were getting a little antsy so we left that for later.

And at long last the after shot of the tail with the R&G kit. All in all it was an easy install. It would have taken only a little bit longer to install the LED turn signals. I will be looking for a bullet to OEM pigtail connector set to adapt the new turn signals so when I do I'll post up an update. This is an easy project for even a novice mechanic, but do your research on the wiring mods that will be needed, especially if you are thinking about future resale value. Get help with the wiring before cutting into the stock wiring harness as that can be expensive to redo later. Keep wrenching!
Blue

Here is the bike. A 2014 Ninja ER 650 Ninja. A parallel twin, 650cc, fully faired, new standard in the spirit of the 70's UJMs. I haven't ridden it, but the upright seating position and high handle bars give a nice, comfortable bike that is great for canyons or commuting. My buddy has had this bike for about a year now and has put on a little over 4000 miles with it. I have seen this bike ridden on multi day trips and slicing around the hills in Malibu. Now that it is thoroughly broken in, it screams when wanted and mild mannered for normal daily use.

Aside from some other routine maintenance, my buddy wanted to clean up the rear end of the bike. You can see in the pic above that the OEMs continue to design sexy flowing bodywork only to then tack on some ungodly ugly contraption of plastic to mount the turn signals and license plate at the last minute. I don't know who is responsible for designing these, but they need a kick in the pants to get them to try harder than this.

This will be the second under tail fender eliminator I have helped someone install. The other was a Yoshimura kit for an FZ-09. This one is an R&G kit ordered from Revzilla. At first glance it is a nice piece and a complete kit. Later on we discovered what to me is the bane of these type of kits that altered our evening plans.

I didn't photo every step of the process, but wanted to start with a quick pic of the starting point. Pulling the two piece seat reveals a very tidy, but surprisingly spacious seat trunk area that comes with a stock tool kit and plenty of extra room for auxiliary tools and other accessories if you wanted. The wiring for all of the lights was neatly secured and out of the way. All of the connections were easy to find, but were a bit tight and required some fiddling to get undone before we broke out the wrenches.

After getting all the wiring taken care of we pulled the stock fender. It is a honking big chunk of plastic with a backbone of metal. We were left with a small opening and a recess for the bracket. From here we started to mess with the R&G under tail bracket. This is where things started to go south. My buddy wanted to take the time to change over to some aftermarket LED turn signals. He went with the advice he found on Revzilla and ordered what he thought was a complete kit that should let him replace all of it at once. Aside from the R&G under tail, he had some R&G LED turn signals and some R&G turn signal resistors to ensure the LEDs flash at the right rate. All of the connections were bullet connectors which didn't match up with the OEM turn signal connections on the wiring harness without cutting and splicing.
Here is where I rant a bit. For the money you pay (always over $100) for what is essentially a bent and painted piece of metal and some some bolts along with vague photocopied instructions, you'd think you wouldn't have cut and splice the stock wiring in order to do complete the install. My other buddy's Yoshimura kit was especially disappointing in that it included some of the cheapest wiring components you could find. A trip to Radio Shack solved that install. We weren't able to do that on the Ninja so we just went with stock turn signals for now. I will do a follow on post when we put on the LED turn signals.


Here it is mounted up from the rear. Much cleaner and more compact. After all was said and done, we couldn't get the license plate light to work. It was just two wires, one red and one black. I hooked them up to their corresponding colors on the OEM harness so it should have been easy. We lost the daylight and both wives were getting a little antsy so we left that for later.

And at long last the after shot of the tail with the R&G kit. All in all it was an easy install. It would have taken only a little bit longer to install the LED turn signals. I will be looking for a bullet to OEM pigtail connector set to adapt the new turn signals so when I do I'll post up an update. This is an easy project for even a novice mechanic, but do your research on the wiring mods that will be needed, especially if you are thinking about future resale value. Get help with the wiring before cutting into the stock wiring harness as that can be expensive to redo later. Keep wrenching!
Blue

Comments
Post a Comment
Thanks for your comments and for following My Motorbike Obsessions!