I was reviewing my footage of my last track day's fastest session. I have two cameras mounted on my Ninja race bike, one of them faces rearward to get a shot of me operating the controls. The other is mounted on the tail of the bike facing forward. Eventually I will edit some cool track race vids, but for now they help me to analyze my body position. One thing I noticed was that the high rise bars on the Ninja stuff me up and prevent me from getting low and off the bike in my turn. I get T-Rex arms that prop me up like a sail. I also sometimes get twisted in the saddle as I can get my butt off the bike pretty far, but not my upper body. I decided to take a chance at some online Chinese clip-ons to get me down low and over the tank. Scroll down to see what it took to make them work.
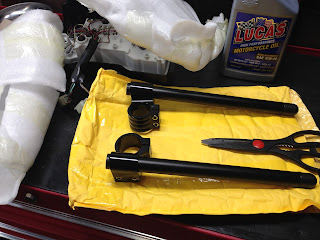
Fresh from the China Post envelope are my new clip-on go fast handle bars! They were well packed in foam inside the envelope and arrived undamaged. Shipping took a while as the bars were held up in the Port of Los Angeles for a little bit. Instant tracking of my shipment made that fact annoying. They are 36mm black anodized aluminum riser style clip-ons with steel tube bars that have small plastic caps on the ends. I only paid $25 for this experiment, we'll see how it goes!
Holding the new bars in the position I plan on trying to mount them to compare the expected difference from OEM shows just how much I could potentially gain from this conversion. I want to get low and forward to remove the T-Rex arm syndrome and prevent my upper body from getting stuffed up in the corners. With this amount of drop I will certainly do that, though I may have some issues with interference between the bars and fairing or other hard parts on the bike.

As expected mounting the bars under the upper triple tree will be a no go. The bottom of the bar hits the fairing even without grips. Time for my back up plan. You can see how much the forks protrude from the upper triple tree just above the clip-on. In this picture it is 13mm which is OEM when I removed the stock risers. My option is to drop the forks lower in the triple and mount the clip-ons on top of the triple tree. This will accomplish two things: 1) I will have lower handle bars than stock even if they aren't as low as the first pic above. 2) dropping the forks in the triple has the effect of reducing the trail of the front suspension. Trail is the measurement of how far the contact patch of the front wheel is behind a line drawn from the headstock at the bike's rake angle to the ground. Its what causes the front wheel to center itself automatically after you stop giving handle bar turn input. The Ninja 250 was meant more as a commuter than a sport bike. It has 83mm of trail from the factory to make it handle predictably and be comfortable with the high rise handle bars and mid-set foot controls. I'm hoping I can drop the front forks enough to mount the clip-ons without making the front end too 'twitchy' which is what happens with too little trail.

Here is a terribly dark pic of what mounting the bars on top of the triple does for the final position. You can see that I they will be higher than the first position pic above, but still lower the OEM. After this shot I spent and hour or so getting them fitted and mounted which involved jacking the front of the bike up and dropping the forks to slide the clip-on into place. With a light bike like the Ninja all of this was easy to do solo. I did have to adjust a myriad of things like the starter switch and master cylinder as well as the clutch lever and even some of the cables and wiring to get a fit, but it all worked out.

And presto! All fitted up and looking pretty good. For this shot I mounted the bike and could immediately feel the difference. My arms were straighter and as I hung off the bike (which is mounted in my floor chock). I could get my upper body closer to the tank and felt my outside arm (when in the cornering position) brush the top of the tank while my inside arm was draped down low with a comfortable bend in my elbow. I was also able to get lower over the tank in a simulated tuck down the front straight. So far so good.


Here are some close-up left and right full lock shots to show the clearance between the control levers and the front fairing. There is no contact between the lever and fairing, but my fingers in the gloves do come close. Notice that the gauge cluster is missing from these pictures. I was fixing some cracked plastic when I was working on the clip-ons. Later on I placed the gauges in place and still had clearance, though I may have to adjust the bars outward in the clip-on risers a bit. I moved the bars inboard a touch to reduce my frontal area.

In this picture I wanted to show how high I raised the forks in the triple trees to get the clip-ons mounted. At the start of this project, the OEM position was 13mm above the triple tree. Now they are 32mm above the triple tree. That might be too aggressive causing the front end to feel twitchy. I won't be able to test it until my next track day coming up at the end of the month. It will make turning into corners easier. When combined with the upgraded fork springs and 2008 Ninja rear shock, as well as the better ergonomic position of these clip-ons, corners entry should be quick. The little Ninja was a touch slow to turn into a corner before its lazy original handling. I will due some research on the effect of raising the forks and maybe take some measurements to verify what the changes were made, if any, to the wheelbase and trail.
I look forward to getting this little bike out on the track. I have another project that I am currently working on that will also add to being in a better position for sporty track riding. It is a more involved project involving lots of fabrication. I also have a new shop tool that I will do a write up on soon. Lots of My Motorbike Obsessions content to come. See you soon!
Blue
UPDATE: The day before yesterday while I was editing this post I was trying to adjust the clutch side bar outward a touch. In the process I stripped one of the recessed socket cap Allen head pinch bolts that hold the bar in position. After a lot of cussing and work I was finally able to get the bar off the bike, but not before destroying the riser clip-on part of the assembly. When I was working on all of this, I told myself to replace the hardware as it looked like it was trash, but in my haste to get the project done I didn't. It stripped like it was made of cheese and caused me tons of heartache and grief. I reordered another set of clip-ons, but unfortunately they won't get here until after my next track day. Big time bummer and a $25 lesson in patience.


Comments
Post a Comment
Thanks for your comments and for following My Motorbike Obsessions!