Race Bike Ergonomics (Part 2): Jockey stance!
After getting the handle bars sorted so that I could get lower on the tank (despite my stripped bolt set back), I wanted to do something similar for my rear sets. The eBay pegs worked great at the Streets of Willow Track day in April. I did feel extra vibration without the OEM rubber pegs, but I was able to move my foot around comfortably and hey... race bike. No one makes race rears sets for the older Ninjas. I have heard that the 2008-2012 Ninja rear sets fit, but at $150 or more for a 'maybe' I wanted to try a cheaper option to get my feet in a racier position. For about $20 I was able to accomplish my goal and have fun doing some fabricating in the shop. Let's see what I did.
 Here is my idea and a popular DIY idea for many aspiring track day racer boys like myself. Take the stock rear set and mount it to a plate or bracket that moves them up and back. On the left you can see the basic approximation of what I want to do. Since I don't want to move the pegs outward or worry about things interfering with the frame, this is only about as much as I can move them. Once I had the general idea down I did some CAD work (cardboard aided drafting) and made a pattern for the steel plate I used.


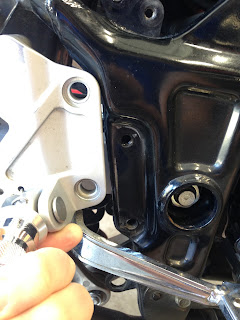
 Here are the brackets almost done. I really want to weld up some nuts on the back of the plate where the OEM bolts (shown) bolt up to the assembly. That way I can avoid using a wrench to mount or remove the rear sets. On the brake side I needed to trim some plastic from the side cover as can be seen in the right picture. A Dremel and a minute of my life was all that took. I also needed to trim the extra long rear brake reservoir hose by about an inch and a half and adjust the brake lever angle. All of these were easy jobs.
 Lastly I needed to extend the shift rod. I went through a couple of designs in my brain while trying to figure this out. In the end it was simple. I got an M6x1.0x60mm machine screw and lopped off its head. I also got a coupler nut with the same thread pitch. Above you can see my test after getting back to the shop following my hardware store shopping trip. Below you can see how it came together. I put the coupler on the lever side of the rod as that side has the right hand threads. The shift shaft side of the rod uses left hand threads to allow for lever angle adjustment. I pinched the coupler using the OEM lock nut and another 6mm nut from my spares. I then threaded the new assembly into the heim joints of the original rear sets and set about playing with the proper shift lever angle. I will need to test it on the track. Adjusting the angle only takes a few minutes so it shouldn't be an issue during one of my early morning sessions. At my last track day I had some problems with getting clean upshifts. I almost converted to GP shift, but wanted to test one thing at the track day without other distractions. I was finalizing my new front and rear suspension settings and confirming tire pressure which took priority over the GP shift.


 All done and mounted! Some blue Locktite and a delicate application of my torque wrench after cleaning up the bike was all it took. I applied some primer and paint to the brackets and let them sit overnight. I think the brackets blend in pretty well to the factory frame color. This was a fun, if involved project. It took a solid week and a half of shop sessions to get done. It is good enough that I'll call it a success. Once my replacement clip-ons get here I will set to really dialing in my race ergonomics and maybe get a track session in to test it all in June if I can.
Lots of stuff keeps getting done to take the Race Ninja over the top. Don't go away or you might miss it. Come back soon!
Blue


I actually made several patterns as cutting cardboard is much easier than cutting the steel. I also made a prototype plate which is what most of the pictures in this post will show. I used 3/16" x 2" steel from the local hardware store. A 3' section should give me plenty of material to try a few variations if I want. I used my cardboard template and marked the steel. I broke out my death wheel and hacked out my first attempt. I learned a few things each iteration of the plate I made. I ended up making three plates, two of which were the final product so I felt pretty good about my work.


It was not a clean job. There was a lot of mess involved with the cutting and grinding. In the drill press you can see that at one point I chucked up my rat tail file to smooth out some of the drill holes. On the right you can see how the first plate mounted and what it would look like on the shifter side of the bike once I got the mounting holes drilled. Initially I thought that I could just make one pattern and flip it over for the other side. Turns out the bolt spacing for the brake and shifter side rear sets are of different. That took a little extra thought when making the final patterns as I had to be very careful when placing the holes to ensure that each peg was the same distance from the ground once done.


Here they are after I got them pretty much done. I was doing a test fit before the final push to completion. I measured the floor-to-peg distance and found that I was off by one centimeter on the brake side which is the side I did last. I'll call that a win. Once I mounted them up I put my boots on a gave it a try. I couldn't feel any difference between the sides with the missing centimeter. The peg position felt awesome when combined with the new clip-ons. My body position was much racier overall. I'm sure I look like a gorilla riding a kids bike with my 6'1", 228 lb. body hunched up on a motorcycle the size of a BMX bike, but it felt good. My knees were a touch higher on the tank and solidly on the grip pads. My butt slid off the seat easily and my inside knee rotated out with ease. The differences to OEM are: a 4 cm change in the overall peg height when measured from the ground. This was done by getting the rear set holes back 37 mm and up 25 mm. This project should add a few degrees of lean angle before I scrape hard parts. Most likely the exhaust cans will hit before my feet or pegs do.


Lots of stuff keeps getting done to take the Race Ninja over the top. Don't go away or you might miss it. Come back soon!
Blue


Comments
Post a Comment
Thanks for your comments and for following My Motorbike Obsessions!