Coming later this month I get to move. I say "get" as after all of the stress of moving, new schools and a new job I will be upgrading to a bigger house with a bigger garage. Thanks to being in the military, the government pays for a full service move. Since I have the trailer I figure I'd move the bikes and some other garage stuff myself. A bonus is that I will make a little cash moving some things myself. When I initially set up the trailer I put it together for one bike. Follow along as I get it ready to move both the bikes in the shop.
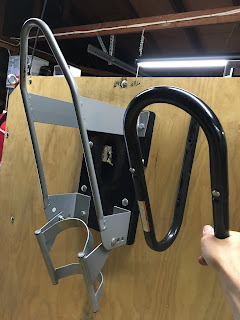
Here I am getting an idea for the position of a second spare chock. I had the chock from the
failed dolly experiment a while back. I kept it around for just this reason. Since the trailer deck measures 48" across I decided to mount each chock inboard 12" so that I have 2 feet between the bikes. This should give me enough space to tie them both down and secure them for the trip. I will have to do other modifications to the deck to aid in keeping both bikes secure from the road and each other. The Ninja has walked its tail across the deck a few times. By itself it is nothing to worry about. I really don't want the FZ and the Ninja banging into each other as I hustle down the road to my new home.

Once I settled on the position, I dug out some nuts and bolts from the spares bin to mount the second chock. I need some stout washers for the nuts under the deck to hold it in place. These $15 Harbor Freight chocks will work, but they are definitely not the strongest choice out on the market. When I load up the bikes, I will use the grey one for the heavier FZ 1000 and the black one for the lighter Ninja 250. Mainly the chocks are for positioning and to locate the front wheel of the bikes. The tie down straps are to hold them in place. The chocks don't need to be all that structurally sound, but they can't fold under the pressure either. For temporary use they should be fine.

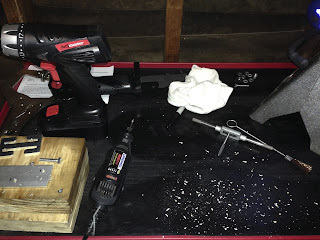
I drilled the holes for the second chock and got it in place. I then hung the original chock with a lashing strap and marked the position for its holes. A few minutes later I had the holes drilled and ready for mounting. There are many things to keep in mind for proper towing and trailer handling. One of them is ensuring that the wheel bearings are properly greased. Too much heat in the bearings causes all kinds of bad news. When I trailed the old TX750 to its new owners I got caught in traffic caused by an accident involving a pickup truck towing an RV rig. Both of the vehicles were flipped on their sides. Tongue weight, the amount of weight at the point the trailer hitch mounts to the tow vehicle, is also key. You want more weight up front than on the back of the trailer. With both bikes in place I shouldn't have any issues.

Here is the big chock all mounted up. I used my impact gun to get the nuts good and tight. Both chocks are secure enough to do the job. I made sure to use some nice fender washers from my box of random nuts and bolts to mount the black chock onto the 5/8" plywood deck. I have yet to seal the deck with any kind of preservative. The trailer lives its life in my current one car garage. Since I can fold it up and store it upright it is easy to push off to the side of the garage and out of the way. That was one of the reasons for getting the Harbor Freight folding trailer in the first place. Keeping the trailer inside will make the deck last a good long time. Eventually I want to seal the deck and get a welder to fully weld up all of the main sections of trailer for more strength. Maybe I can pick one up after the move.

An addition to the trailer is this pivoting wheel jack also from, you guessed it, Harbor Freight. For $20 whole American dollars I will be able to disconnect the trailer from my Ridgeline with the bikes attached and leave the trailer in the street after a day at the track. As it stands now, I have to unload everything as soon as I return or early the next day so that I can use my truck. With the jack, I can unhitch and use my truck until I have more time to unload everything. Unfortunately, the bolts supplied with the jack are too long. They don't have enough thread left for tightening once mounted up on the trailer's side rail. I did move the spare tire to the left side of the trailer to leave more room for the Ridgeline's side opening tailgate. Having it on the left makes it easier to get gear from the lockable bed truck without me bumping my butt on the spare. I'll get some bolts later and in 15 minutes it will be complete.

The last addition I needed to do is add an extension to the front of the trailer to move the tie down eye bolts further outboard. I had the eye bolts mounted on the outside front corners for the one bike configuration. With two bikes these would be too narrow to get a good solid hold on the bikes. I took a 6' piece of 1 1/2 inch angle steel from the hardware store and slid it under the deck after removing all of the front deck mounting bolts. I re-secured the deck through the angle and moved the pre-existing eye bolts to the outside ends of the angle. I changed out the center bolt for a third eye bolt to provide for the center tie down mounting point. After I get the jack secured I will load the bike up and practice tying them down to ensure the system works as designed. I will also have to figure out how to keep the back wheels from hopping around, but that will most likely be by using some scrap 2"x4"s on either side of the rear wheels.
A relatively easy project that took longer than I wanted it too as I just couldn't make it out to the garage to get to it. I look forward to testing out the two bike configuration of the trailer. My buddy Torque Wrench and I have tentative plans for another round of California Superbike School planned later this year and having both bikes on the trailer will make logistics easier. I also want to possibly get some dirt bikes for the family one day. Between the trailer and the bed of my Ridgeline gives me many options for full on family Motorbike fun. I might be able to squeeze out one more post before my move. Don't go far as good things are in the works for My Motorbike Obsessions!
Blue


Comments
Post a Comment
Thanks for your comments and for following My Motorbike Obsessions!