I have been offline for a while thanks to work trip to Mississippi. I tried to get this project done before the trip, but lost out on time. Here is the completion of this project, delayed, but complete.
After my track day at Buttonwillow and the weeks that followed, the Ninja was sitting just as I unloaded it from the trailer. My list of post-track bike preps gets longer and longer every time I learn something more about riding fast. One project that I have been wanting to do for a while was to remount and balance the Ninja's tires. I've mentioned it in the past, but now was the time. Here we go...
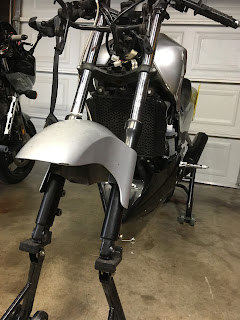
And we're naked. I have taken off and put back on the fairing so many times now that it takes mere seconds to do. That being said, I'm still thinking of ways to make it faster. The fairing mounts using 4 bolts, but if I could get that down to a few spring clips then it could be even faster. I whipped out my front stand and removed the front wheel in almost as little time. One thing I'm practicing with this job is using only my track tool box to do the work or at least the bulk of the work. That way I can ensure that I have all the tools I need to do some quick emergent work at the track if needed.
I broke out the
wheel balance stand from a few posts back and set the front wheel assembly in place to check its balance. With the front wheel I found that it was well balanced and only had 14 oz of weight. The rear wheel however has 12 weights stuck to it for a total 84 oz of wheel rim weights. No Bueno and a sign that the shop that did the mounting of the tire was being lazy. The rear wheel assembly was adequately balanced, but I just couldn't stand having all of those extra weights. Let's Ride track days requires tape over the wheel weights for their track days and my rear wheel looked like it was held together with duct tape.
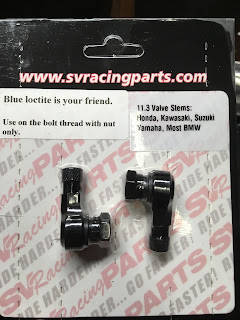
The other reason I wanted to rebalance the tires were these parts. These are 90° valve stems. These particular ones came from SV Racing Parts, but many places sell basically the same thing. They are aluminum and thread into the stock valve stem hole. Once I get them mounted I will be able to check my tire pressures a bit easier. With the front tire, I just have to avoid the front brake disc. It is usually pretty hot when I get off the track. In the rear I have the brake disc on one side and the drive sprocket on the other. Both are a little warm straight off the track and the sprocket is large enough to make getting to the valve stem a challenge. The 90° turn these valve stems have should make it a touch easier.

After checking the balance, I broke out my Harbor Freight Bead Breaker and quickly popped the bead from the rim. For the Ninja's little wheels and tires this tool works pretty well. For larger wheel and tire sets I need some extra leverage from the handle. The angle of the handle ends up pointing too vertical to get a good push. Modern sport bike tires have very good technology built into them and the beads seat VERY firmly. When setting the bead in the shop with my air compressor, the pop is pretty aggressive. Consequently trying to pop the bead takes a bit of effort.

Now for the part I really don't like, removing the tire from the rim. I don't yet have a tire changer to make things easier. Once I get more into track days and racing and begin chewing through tires faster, it will definitely be in my shop. Until that magical day I'm stuck using my tire irons and soapy water. Having practiced with the V-Strom a couple of times, I'm cognizant of the process, but my methods need more refinement. I grunted and cussed, but got the tire off the rim in about 10 minutes. Again the smaller size of these tire made that easier. After removing the tire, I removed the weights and cleaned the rim to remove tape goo and brake pad dust to get the rim ready for the new valve stems.
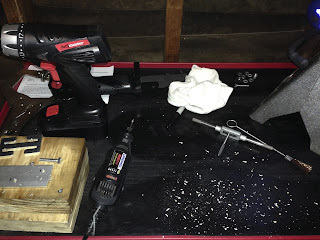
Before putting the tire in place, I put the wheel with the 90° valve stem on the balance stand and found the heaviest point of the rotating assembly. To mount the valve stem I needed to get creative with my tools. The stem uses a 14mm nut to secure it to the rim. The narrow rim width made all of my sockets and wrenches too big to fit. I took an extra socket and thinned the edge with a grinder and was able to get the nut torqued down properly with a little blue thread locker for good measure. I wrestled the tire onto the rim. Before setting the bead I put the whole thing back on the balance stand. I found the heaviest point of the whole assembly and marked the tire. I then moved the tire around to get the whole assembly as balanced as I could before setting the bead. I put the tire/wheel assembly back on the balance stand and this time the front didn't need any weights. I've shed some weight and got the valve stems in better position which makes this project a success.
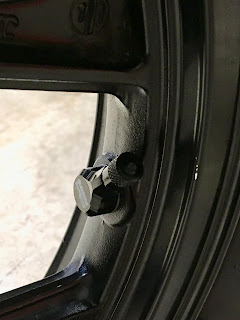
Here is a pic of the new valve stem for comparison to a standard rubber one. You can see that the valve stem is a bit better placed to make reading the pressure easier. My tire fill chuck also lines up better for easier tire filling at home before l leaving for the track.
I repeated the whole process for the back wheel and also shed more weight. The rear was the worst offender as far as excess wheel weights with 16 weights totalling 28 grams. I'm glad I did this. The new valve stems will make airing up the tires and checking pressures at the track much easier. While I was at it, I mounted up the second set of clip-ons. This time I went below the triple tree as I plan on not using the upper fairing. I really want to get down over the tank for better corning body position.
I have a couple of quick projects on deck for this summer season. I won't get to the track for a while with my work transfer coming very soon, but I have plenty of things I want to get done. Come on back for more action soon.
Blue


Comments
Post a Comment
Thanks for your comments and for following My Motorbike Obsessions!